Angular is a Javascript framework to build more interactive web apps. It is designed for both Web, Desktop and Mobile platforms. While, we create apps using HTML, CSS and Javascript, Angular requires us to know Typescript (a typed superset of Javascript that scales), kind of stricter version of Javascript provided with OOP features. And although there are other alternatives, Typescript is the most widely used language for Angular apps.
Why do I need to use Angular
There is nothing inherently wrong with using vanilla JavaScript/jQuery. In fact, a lot of web applications out there are built this way. But as your application grows, structuring your code in a clean, maintainable and testable way, becomes harder and harder. It’s not impossible, but using a framework like Angular, makes your life far easier. Sure, there is a learning curve involved, but once you master it, you’ll be able to build client applications faster and easier.
Let’s get started
Now, let’s get dive into some coding and get our hands dirty! The first thing you need to install is the latest version of Node. If you haven’t done that yet, head over to nodejs.org, and install the latest stable version.
Node comes with a tool called Node Package Manager or NPM, which is used for installing third-party libraries. In this guide, we’re going to use NPM to install Angular CLI. That is a command-line tool we use to create a new Angular project. It is also used for generating some boilerplate code during development (such as components, services, etc) as well as building an application for deployment. We do all this in the terminal.
So, once again in the Terminal, run the following command to install Angular CLI:
npm install -g @angular/cli
The -g flag stands for global. If you don’t put -g here, Angular CLI will be installed only in the current folder you’re in, and will not be accessible anywhere else.
If you’re on Mac, you may have to put sudo at the beginning of this command to execute it as an admin; or you may get permission errors.
Curious to create a project?
With Angular CLI in place, we can now create a new Angular project using the following command:
ng new hello-world
You realize now that we can access Angular CLI using ng. We provide a command (in this case new) to instruct Angular CLI on what we want it to do for us. Here, we are telling Angular CLI to generate a new project called “hello-world” and store it in a folder with the same name. Let’s do a few tweaks to see our new Angular app in the browser.
So, run the following commands in the terminal:
cd hello-world
npm install
ng serve
The second command (npm install) installs all the dependencies of our application. The last command (ng serve) compiles our application and hosts it using a lightweight web server. Now, we can access our application at http://localhost:4200.
So, open up your browser and navigate to this address. You should see the following page:
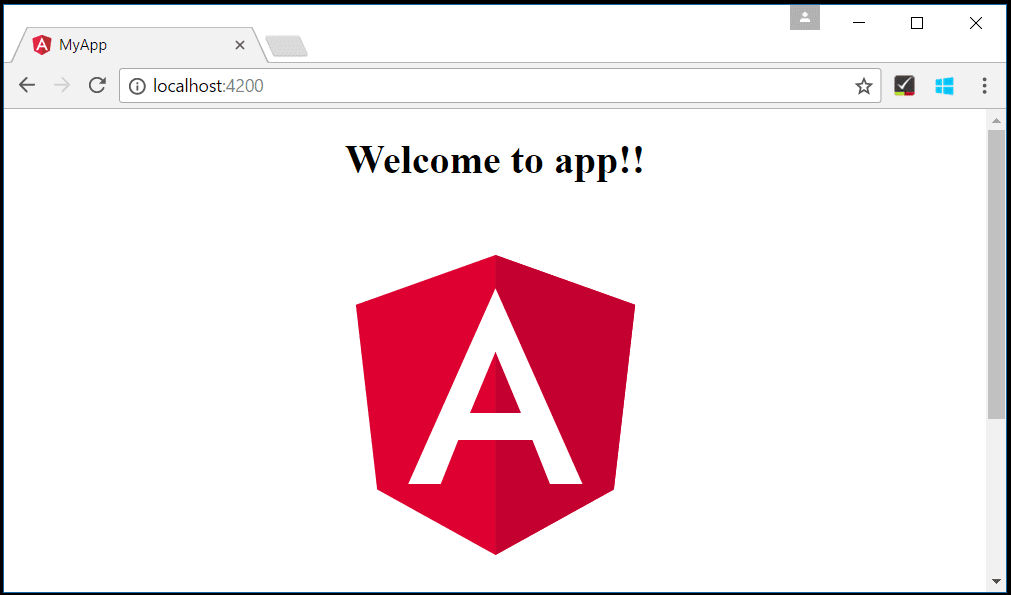
Congrats! You generated and served your first Angular application.
This is just an introduction to setting up an Angular project. To know more, go ahead and checkout these awesome resources.
https://angular.io/start
https://cli.angular.io/